
The Course Catalog determines the list of courses students can add to their High School Planner.
District Admins can set up and manage the Course Catalog for their district, including adding and editing courses and managing course visibility across buildings. Building Admins can manage the visibility of courses in their building.
Choosing State Catalog or My District Catalog
Importing Courses to My District Catalog
Adding a Course Manually to My District Catalog
Managing Courses Visibility for Students by Building
Visibility for Multiple Courses
Visibility for Individual Courses
Editing Course Information for My District Catalog
Deleting a Course from My District Catalog
Searching and Filtering the Course Catalog
Choosing State Catalog or My District Catalog
District Admins can choose to use the state catalog if available or create their own district catalog.
The state catalog is available only in certain states. States without a pre-populated state catalog should set up My District Catalog.
| Option | What you can do |
|---|---|
| State Catalog |
If a state catalog exists, courses and programs of study will be pre-populated with state-approved options. District and Building Admins can manage the visibility of courses and programs of study by building, but cannot add, edit, or delete them. |
| My District Catalog |
District Admins can upload their district's courses using a templated CSV import or add courses individually. They can edit and manage the course offerings, including programs of study. Building Admins can manage the visibility of courses and programs of study, but cannot add, edit, or delete them. |
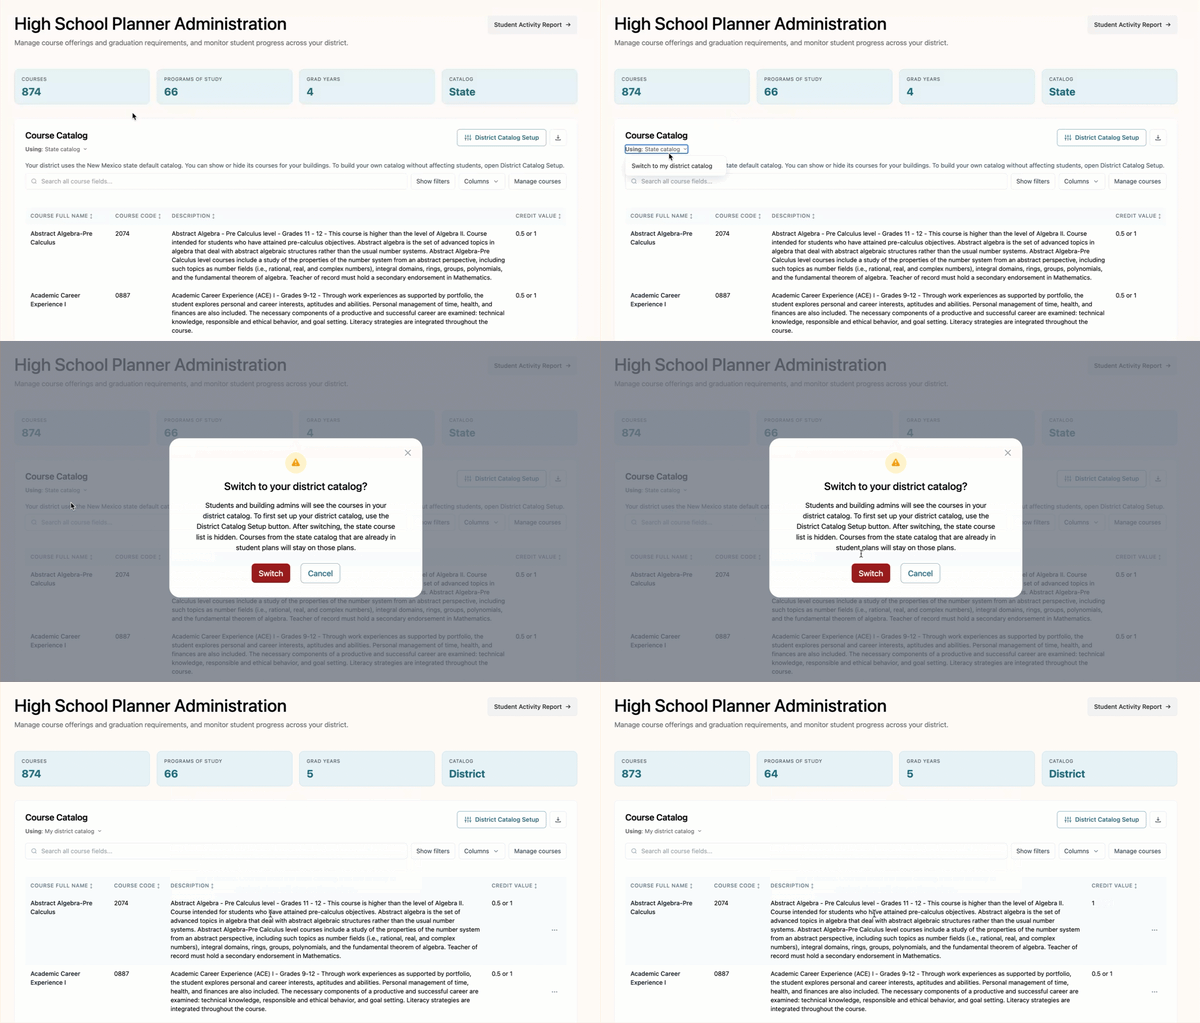
If a state catalog is available for your state, it will appear by default. To switch catalogs, open the Using drop-down menu under Course Catalog and select Switch to my district catalog.
Importing Courses to My District Catalog
If District Admins choose to setup their own District Catalog, they can import courses or manually add courses one at a time.
To import courses, open District Catalog Setup and click Start course file import.
If you haven't already downloaded the template, click Download template.
Complete the course catalog template according to the Import File instructions. Enter one course per row, keeping the template's existing columns. Include the course details, such as the course code, name, graduation requirement, credits, and grade levels.
Once you have completed the template, save the file as a CSV. Then, upload the completed CSV file by dragging it into the upload area or selecting the file from your computer.
Click Preview to review the courses that will be added or overwritten.
To add the courses, click Import. If your file includes existing courses that you want to replace, click Import and overwrite.
If you are switching catalogs, return to District Catalog Setup and click Switch to District Catalog. Confirm the catalog switch.
IMPORTANT: Importing a course with an existing course code will overwrite the course data with the information in your file.
New courses are initially visible at all buildings. District and Building Admins can manage visibility after import.
Adding a Course Manually to My District Catalog
Only District Admins can manually add courses to My District Catalog.
To add a course, open District Catalog Setup and click Add one course.
Enter the course details. Each course must have a unique course code. To update the details of an existing course, see Editing Course Information for My District Catalog.
Under the Visible for Students at settings, select the buildings where the course should be available to students.
Once you have entered all the course details, click Save course.
Managing Courses Visibility for Students by Building
Students can add visible courses to their High School Planners. District and Building Admins can manage which courses are visible to students by building.
Visibility for Multiple Courses
To update the visibility of multiple courses, click Manage courses.
Select the checkboxes next to the courses you want to update.
In the Show or hide for student box, select a building or choose All buildings from the drop-down menu.
Click Make visible to allow students at the selected building(s) to add the courses to their High School Planners. To remove the courses from students' available choices, click Hide.
Visibility for Individual Courses
To manage course visibility individually, open the ellipsis menu (⋯) next to the course and select Edit course.
Under Visible For Students At, use the checkboxes to select the buildings where the course should be available to students.
Click Save course to apply your changes.
Editing Course Information for My District Catalog
District Admins can edit the information for individual courses in My District Catalog.
To edit a course, open the ellipsis menu (⋯) next to the course and select Edit course.
Update the applicable course details.
Once you have finished making changes, click Save course to save your updates.
IMPORTANT: Course codes cannot be changed after creation. To use a different code, add a new course or import it using a file.
Course information can also be updated by importing a file using the same course code as an existing course. Remember, importing a course with an existing course code will overwrite the course data with the information in your file.
Deleting a Course from My District Catalog
District Admins can delete courses from My District Catalog to permanently remove them.
Only courses not added in students' High School Planners can be deleted.
Deleting Multiple Courses
To delete multiple courses, click Manage courses.
Select the checkboxes next to the courses you want to delete.
Under the Delete courses box, click Delete.
Review the confirmation message and confirm the action to permanently delete the selected courses.
Deleting an Individual Course
To delete one course, open the ellipsis menu (⋯) next to the course and select Delete course.
Review the confirmation message and confirm the action to permanently delete the course.
Courses already included in student plans are hidden at all buildings instead. These courses remain in existing plans with a No longer offered label.
To prevent students from adding a course without deleting it, hide the course from buildings.
Searching and Filtering the Course Catalog
The Course Catalog includes tools to help you find and organize courses.
- Search: Search course information across the catalog.
- Show filters: Display search bars for individual table columns.
- Columns: Choose which course details appear in the table.
- Rows per page: Adjust how many courses appear at once.
- Pagination: Navigate between pages using page numbers or the Previous and Next buttons.
- Download: Download the whole course catalog as a CSV file.